My computer has been giving me fits all week long. I have spent most of the day trying to fix things and at least I can now get in to post! GRRRR!
Watch for a REAL post tomorrow!
Debbie
Friday, February 3, 2012

Friday, January 27, 2012
Laundry Soap
Have you tried the homemade laundry soap that has been on pinterest? This is another recipe that Kelsie and I made, and I love it! Being Creative to Keep my Sanity is the website we used.

1 4 lb 12 oz box Borax (2.15 kg or 76 oz) found in the detergent aisle
1 4 lb box Arm & Hammer Baking Soda (1.81 kg) found in the cooking aisle
1 box Arm & Hammer Super Washing Soda 55 oz (3 lb 7 oz) found in the detergent aisle
3 bars of Fels-naptha soap, found in the detergent aisle,(you can also use pink Zote soap instead--available at Home Depot)
2 small containers of oxyclean or store brand oxyclean (try to get about 3.5 lbs total (1.58 kg)) found in the detergent isle.
You should be able to find all of these items at your grocery store, for about $20. You only use 1 Tbl. per load, so it lasts a LONG time.
To Make:
Grate the Fels-naptha soap (with a cheese grater)
Toss all of the ingredients into a 5 gallon bucket lined with a garbage bag
Shake or stir well
Store in a jar or a bucket and that is it! So easy and so cheap!
I have a high efficiency washer and this soap has worked fine...not too sudsy!
Debbie
Head over to the blog for her great tutorial!
(the pictures are also from the website.)

Here is what you need to make the soap(the pictures are also from the website.)


1 4 lb 12 oz box Borax (2.15 kg or 76 oz) found in the detergent aisle
1 4 lb box Arm & Hammer Baking Soda (1.81 kg) found in the cooking aisle
1 box Arm & Hammer Super Washing Soda 55 oz (3 lb 7 oz) found in the detergent aisle
3 bars of Fels-naptha soap, found in the detergent aisle,(you can also use pink Zote soap instead--available at Home Depot)
2 small containers of oxyclean or store brand oxyclean (try to get about 3.5 lbs total (1.58 kg)) found in the detergent isle.
You should be able to find all of these items at your grocery store, for about $20. You only use 1 Tbl. per load, so it lasts a LONG time.
To Make:
Grate the Fels-naptha soap (with a cheese grater)
Toss all of the ingredients into a 5 gallon bucket lined with a garbage bag
Shake or stir well
Store in a jar or a bucket and that is it! So easy and so cheap!
I have a high efficiency washer and this soap has worked fine...not too sudsy!
Debbie
Tuesday, January 24, 2012
DIY Soft Scrub Cleaner
I found a recipe for this wonderful cleaner at Live Renewed Homemade Soft Scrub for Bath and Tile
 Photo by Stacy @ Delighting in the Days
Stacy has an entire guest post at Live Renewed, about cleaning the bathroom effectively without using harsh chemicals. It is well worth reading.
She says:
This recipe is adapted from the recipe for Earth Paste in Clean House, Clean Planet by Karen Logan (page243). It is quick and easy to put together and effectively cleans the bath (hooray). Make this in small batches because it can dry out and harden when stored. This recipe makes enough for two to four uses. Keep any remaining mixture in an air tight container.*
Ingredients
3/4 cup baking soda (slightly heaped)
1/4 cup castile soap (I use Dr. Bronners Peppermint)**
1 Tablespoon water
1 Tablespoon vinegar
Method
In a bowl, combine the baking soda and castile soap. Add the water and stir with a fork.
Lastly, stir in the vinegar. The mixture will fizz a little. Stir to make a nice soft, paste-like, consistency. (This is important – the vinegar must go in last or else the scrub will be like sludge instead of a creamy paste.)
Scoop out the scrub with a sponge and start cleaning.
This scrub can also be used to clean the toilet.
* Mine has lasted fine in an airtight container. I just stir it with a fork before using
**I used lavender castile soap
This scrub works great on my stove when something spills over, and I LOVE how it smells. You can make it up in less than 5 minutes!
Happy Cleaning! (Is that an oxymoron?)
Debbie
Monday, January 23, 2012
DIY soaps and cleaners
Kelsie is getting ready to move away so her husband can go to medical school. They are very frugal and do an amazing job managing their money! Kels went looking online to come up with some CHEAP cleaning supplies and she found some awesome websites! Each day this week, we will share a website and the product we made from their recipe. You can make most of them for pennies and they work just as well as the real deal. So grab a friend and have a girls night out making cleaning products...we did it and it was great fun!
Debbie
Homemade Fabric Softener from thefrugalgirls.com
Hop on over to thefrugalgirls.com to see the rest of their great homemade products!

By Heidi on October 18, 2010
"If you’ve been wanting to cut costs on Fabric Softener… try making Homemade Fabric Softener!
What You’ll Need:
6 cups HOT water
3 cups white vinegar
2 cups Suave Refreshing Waterfall Conditioner {or other favorite scent}
What You’ll Do:
Mix conditioner & hot water well, until conditioner is dissolved completely.
Add the vinegar, and mix well.
Store in a large container {empty fabric softener container, empty large vinegar bottle, etc}
Pour into a downy ball… or use approx. 2 tbsp. in the fabric softener spot in your laundry machine… then wash!"
Note: You can also add a few drops of essential oil to make the good smell stronger. I made this once before, a few months ago, and I didn't like that I could still smell the vinegar. This time, I added essential oil, and it does not smell so much like vinegar. I also used a Downey ball this time, and it seems to broadcast the softener better.
Friday, January 20, 2012
Valentine goodies
Hi there! Today I am posting ideas Kelsie found on pinterest for yummy Valentine treats. Be sure to click on the websites to get recipes and more ideas!
Debbie
 From: goldenstatefruit
Cherry Chocolate Kisses
 From: thecurvycarrot
Pound Cake--cut pound cake into circles and cover with pink frosting
 From: bit.ly
And finally...lots of great ideas at this valentine party site!
 From: //http://amandaparkerandfamily.blogspot.com/2010/02/valentine-soiree.html
Debbie

Cherry Chocolate Kisses

Pound Cake--cut pound cake into circles and cover with pink frosting

And finally...lots of great ideas at this valentine party site!

Wednesday, January 18, 2012
My Cute Christmas Present
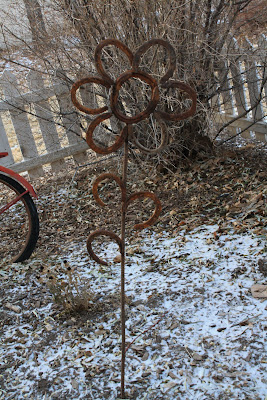
When I opened my stocking this year, it had NOTHING in it,(except what I put in it!) Kelly came running in with these flowers in his hands, saying, "Sorry, I forgot to put these in your stocking!" He welded old horseshoes on to rebar to make the flowers, and they were as tall as me! I think that they are so adorable "planted" in my front flower garden. (He had to drive a stake into the frozen ground before we could plant them!)
I am a lucky girl!
Debbie



I am a lucky girl!
Debbie


Saturday, January 14, 2012
Organizing Ideas
Do you use Pinterest? Pinterest is an online bulletin board where you can store ideas--it is so cool!
Have you ever found a great idea online that you were going to use later, and then when you go back,you can't find it!
Pinterest can solve that.
You request an invitation at www.pinterest.com. They will send you an email and you get a "pin" control in your bookmark link. Log in to the site, and click on your account (right hand corner of page),there is a drop down menu--click on the link for boards.You can create any number of boards. Some of my boards are: kindergarten teaching ideas, what's for dinner, Christmas, Halloween, Valentine's Day, etc.
Then when you find an idea you want to save, you click on pin (from your bookmarks), and pin the picture onto a board to save. The coolest thing about pinterest is that when you view your board and click on the picture, (your idea), it comes up with the website link. Click on the link, and you go straight to the blog or website.
You can also search pinterest to look at ideas others have posted. This is a great resource when you are looking for something specific: ie. valentine decorations, ideas for achievement days, craft projects, what to make for dinner. When you see an idea on pinterest, put the cursor on the picture and you will see the option of repin. Click on repin, choose your board and click pin it. It will show up on your board.
When you search pinterest, you can type a subject in the search box, or scroll over "everything" to search for a particular subject. You can also click on everything, and you will see a mix of pins.

(Image from Golocal.com)
Be aware, however, that when you click everything, you will see some things that are not desirable. Some people post things that have rude language, and pictures that are offensive.
I still click everything,though, because I like to see the variety of pictures. I always find ideas that I didn't know I was looking for!
So there you have it...pinterest in a nutshell!
Try it out and you might get addicted!
Wednesday, January 11, 2012
Organizing Your Home
I found an awesome site that teaches you to organize your home, by competing a house cleaning project each week. If you sign up, you will receive an email each Monday detailing the week's challenge. I love how it breaks your house up into small pieces and I have found each challenge very doable.
Here is the challenge for this week:
Week #2 Organized Home Challenge: Kitchen Drawers and Kitchen Cabinet
This week's challenge is all about kitchen drawer and kitchen cabinet organization, where you will both declutter and organize things in a way where you can easily access what you need, when and where you need it.
 photo from:thedecorologist.com
Head over to Home Storage Solutions to read about the challenges!
Here is the challenge for this week:
Week #2 Organized Home Challenge: Kitchen Drawers and Kitchen Cabinet
This week's challenge is all about kitchen drawer and kitchen cabinet organization, where you will both declutter and organize things in a way where you can easily access what you need, when and where you need it.

Head over to Home Storage Solutions to read about the challenges!
A Wider Blog Space!
I hope that you noticed the difference in our blog today! I finally got rid of the skinny layout. Wahoo! I found a wonderful post that tells you how to do it. Head on over to The Letter 4 (here) to to read the tutorial. As you can see, I haven't figured out how to center the title yet, but I have Haylie working on it. I will let you know when I figure it out. Enjoy! Debbie
Tuesday, January 10, 2012
More Organization Tips
I love organization--my mind just works that way!
I saw a great idea a long time ago on pinterest, for a business planner that used sticky notes. I decided to make a modified book to organize my life. Here is what it looks like.
 I started out by dividing my life into all of the sections I could think of: physical, church, school, education, gifted blog, etc. etc. I wrote each section on tabs and divided my book into two pages for each section.
I glued a sticky note holder onto the back.
 I write each task that I need to complete, on a sticky note and put it in the section. When the task is completed, I just pull the sticky note off. I carry the planner in my purse wherever I go and it has worked marvelously.
I saw a great idea a long time ago on pinterest, for a business planner that used sticky notes. I decided to make a modified book to organize my life. Here is what it looks like.

I glued a sticky note holder onto the back.

Monday, January 9, 2012
Hello Everyone!
We are back! Debbie successfully finished her Master's Degree. Kelsie had her sweet little baby girl, and Haylie moved her family to a new state. We have been crazy busy, but we are back. We plan to post nearly every day, so come and visit!
HAPPY NEW YEAR!
If you are like most people, you have a handful of New Year's Resolutions that you are working on. I know that I have my share of them. This year, I have been reading a lot about, "making those resolutions stick," and I have learned a lot of interesting things that I want to share with you:
1. Write it down
Make a list of your resolutions and keep it somewhere where you can look at it often. If you are still trying to decide what resolutions to choose, Tsh,at Simple Mom,has some great questions to guide you...click here to go to her post.)
2. Break the resolution down into small pieces.
This idea was one of those ahhh experiences for me--it just made so much sense. There is another great post at Simple Mom that tells you how to accomplish this. (If you do not read the blog at simplemom.net, I would highly recommend it--they are amazing!) Here is a little bit of the post: "Kaizen is a Japanese word that means very small, continuous change. It’s little drips of water that fill a bucket over a long period of time, not a firehose in a few minutes." (Click here to read the entire post.) She explains how kaizen works, using the goal of waking up one hour earlier each day. She advocates setting the clock 2 minutes earlier each day. So...on the first night,if you usually get up at 7 a.m., you would set the alarm for 6:58 a.m. The next night, you would set your alarm for 6:56 a.m. You continue this process for thirty days,and ta da! you are getting up an hour earlier. Isn't that easy?
I put this into practice with exercising. It seems like I do really well in this area for a while, and then I go for a long time without a steady exercise routine. So, for the first week, I decided to exercise two times during the week. This week, the goal is three times, and eventually I will go at least five times a week. It seems so doable, and it gives me days to mess up at first, and still make my goal as I change my habits!
3. Write down your mini-goals.
I made this little book to keep track of my steps toward my resolutions.

The composition book has 100 pages, so I dedicated two pages to each week. I wrote the dates on the top of the page, and then all of my mini goals for the week, ie. exercising three times this week, and reading my scriptures at least three nights before going to sleep, etc. It has really helped me to record my little steps and work on successfully accomplishing my goals.
3. Tell yourself that you are not going for "Perfection," but for "Improvement."
This helps a ton if you are a little bit of a perfectionist like me! I choose not to focus on perfection, but instead on improving! I can keep going if I believe that the goal is improving--this leaves wiggle room when life gets in the way of the best laid plans. I do not have to be perfect in completing goals, I just have to be doing better each week.
One of my favorite quotes is by Joseph Smith. He said, "Direction is infinitely more important than speed." I love this thought!
Let's all head the right direction and improve ourselves day by day!
Debbie
Saturday, May 21, 2011
A Teeny Tiny Birthday Party
My littlest chick turned 10 last week and she wanted a "Tiny" Birthday Party. We brainstormed a few ideas, looked on the internet, and this is what we came up with...
Invitations:

I typed up the text for the invitations using Calibri, font size 8, and then reduced it 20% on the copier. We backed them with scrapbook paper, and made tiny envelopes. I had lots of little magnifying glasses, so we gave each girl one, with the invite.

Games:
The first thing we did was to decorate tiny little cakes. My little chick had an American Girl magazine that featured tiny treats for girls to make. It was taken from their book called Tiny Treats.

To make the cakes, take 2 oreos or other round cookies. Frost the top of one cookie and stick the second one on top. Then frost the two cookies as if they were a cake. I let the cakes sit overnight, and they soften so that you can cut them!
 Image from unconfidentialcook.com
To decorate the cakes, we used small tubes of icing, (the ones that are made for writing on cakes), and sprinkles.

Next we went on a teeny tiny treasure hunt. The clues were made just like the invitations, and I posted them outside. The group had a magnifying glass to read them. (They were pretty tough to find, because they were so small, which was great fun for girls this age.) At the end of the hunt, the treasure was individual bags filled with tiny treats: a package of Gripz Chips Deluxe cookies,Gripz Cheez-it crackers, tiny nail polish, tiny little dogs with collars, leashes, blankets and chew toys.
The dog idea was from the American Girls Tiny Treasures book.

The last game we played was "How well do you know Little Chick?" We made up a list of questions: favorite color, favorite class at school, etc. and we gave the test to all of the party goers. The girl who got the most right, won the game.
Come back on Monday for part two, where we will talk about food to serve at a Tiny party!
Invitations:

I typed up the text for the invitations using Calibri, font size 8, and then reduced it 20% on the copier. We backed them with scrapbook paper, and made tiny envelopes. I had lots of little magnifying glasses, so we gave each girl one, with the invite.

Games:
The first thing we did was to decorate tiny little cakes. My little chick had an American Girl magazine that featured tiny treats for girls to make. It was taken from their book called Tiny Treats.

To make the cakes, take 2 oreos or other round cookies. Frost the top of one cookie and stick the second one on top. Then frost the two cookies as if they were a cake. I let the cakes sit overnight, and they soften so that you can cut them!

To decorate the cakes, we used small tubes of icing, (the ones that are made for writing on cakes), and sprinkles.

Next we went on a teeny tiny treasure hunt. The clues were made just like the invitations, and I posted them outside. The group had a magnifying glass to read them. (They were pretty tough to find, because they were so small, which was great fun for girls this age.) At the end of the hunt, the treasure was individual bags filled with tiny treats: a package of Gripz Chips Deluxe cookies,Gripz Cheez-it crackers, tiny nail polish, tiny little dogs with collars, leashes, blankets and chew toys.
The dog idea was from the American Girls Tiny Treasures book.

The last game we played was "How well do you know Little Chick?" We made up a list of questions: favorite color, favorite class at school, etc. and we gave the test to all of the party goers. The girl who got the most right, won the game.
Come back on Monday for part two, where we will talk about food to serve at a Tiny party!
Friday, April 8, 2011
Using and Storing Fresh Herbs--Sage
Sage is an herb from the Mediterranean, but it is widely available here, (think Thanksgiving and stuffing!) Fresh or dried sage can be used to flavor meat before cooking--just sprinkle it over the top. A sprig of it can also be put inside a chicken or a turkey breast. You can also put leaves and left over stems on the charcoal when grilling and it will flavor the meat. See E How for more information.
 (Image from theherbgardner.blogspot.com)
Storing fresh sage:
Fresh sage can be cut, wrapped in paper towels, and stored in a plastic bag in the fridge for 4-5 days. Leaves can also be picked, covered with olive oil, and then stored in the fridge for up to 3 weeks. Be sure to use the flavored oil.
Freezing Sage: Sage can be easily frozen, just wash and dry leaves, pack loosely in plastic bags and freeze for up to one year. Freezing will intensify the flavor. More information here.
Drying sage:
Dried sage is preferred by most cooks. There is a wonderful tutorial here. Sage can be dried by tying sprigs together, putting them in a brown paper bag, and hanging the bag upside down for a couple of weeks. Be sure to cut a few slits in the bag. When the herbs are dried, separate the leaves from the stems and store them in an airtight container. The leaves can be crushed, but the oils will last longer in whole leaves.
Sage as medicine:
Sage can be used for medicinal purposes too! Suite 101 has a really good article about this. Sage is a natural source of estrogen and can be helpful in combating menopausal symptoms, such as night sweats. To do this, put 10 fresh leaves in a cup, pour boiling water over the leaves, and let it for 5 minutes. Strain out the leaves and add a bit of honey. Drink this tea one hour before bedtime for three nights, and then every few nights after that. Sage can also be taken in a gelcap if you do not like the taste of the tea!
See you back on Monday!
Have a great weekend.
Debbie
Thursday, April 7, 2011
Using and Storing Fresh Herbs--Oregano
Oregano is a member of the mint family. It is a strong, bold herb that can be used to make many dishes. Most recipes call for garlic and oregano to be paired together. Oregano leaves can be snipped off and used directly. Fresh oregano stems can also be cut and stored in a plastic bag in the fridge.
 (Image from examiner.com)
Drying Fresh Oregano: Click here for a more in depth description from E How.
To dry, cut stems of oregano and hang upside down in a cool,dark place. Dried oregano can then be put in a paper bag to catch the leaves as they fall. Remove the leaves and store in an airtight container.
Freezing Oregano:
If you freeze oregano, it will retain more of its flavor and aroma. Freezing is simple...cut a stem of oregano, strip the leaves off, and put them in freezer bags and freeze. Another way to do it is to lightly chop the leaves, mix with olive oil and put the mixture into ice cube trays and freeze. Be sure to label the bag, and store the cubes in a ziploc bag in the freezer!
Come back tomorrow to talk about sage.
Have a great day!
Debbie
Wednesday, April 6, 2011
Using and Storing Fresh Herbs--Basil
I LOVE the smell and taste of basil! My plant perfumes the entire kitchen when it is handled at all. Basil leaves can be picked and used directly in everyday cooking.
 (Image is from diylife.com)
You can also cut entire stems of basil for future use. According to E How Food, cut basil should not be stored in the refrigerator. They suggest, instead, that basil should be cut and then the stems should be put into a glass of water and left out on the kitchen counter top, where it will last for days or weeks. Note: If you purchase the basil at the store, cut the stems before putting into water. Also, the cut basil should not be in direct sunlight.
Freezing Basil...
Basil is a soft herb, but it can be easily frozen:
Chop the basil and put it into ice cube trays--cover each section with water and freeze. Pop the ice cubes out and store them in a large ziploc bag.
 (Image from the website Kalyn'skitchen.com)
Another great way to freeze basil, is to coarsely chop it in a food processor,(with two or three tablespoons of olive oil drizzled in per batch.) Be sure that all leaves are coated with oil, (this will keep them from turning black in the freezer.) Kalyn's Kitchen has a step by step tutorial here.
Growing Basil...
Basil requires 6-8 hours of sunlight and well drained soil. Pinch off the flowers as they begin to form. Haylie let some of her basil flower, and it changed the flavor of the leaves on that stem. She pinched off the flowers, including the surrounding leaves, and the rest of the plant tasted ok.
Read more about growing basil here.
E How has a pesto recipe that I want to try. It sounds so easy!
 (Image from statenislandfoodandwine.com)
Everything goes into a food processor:
2 cups fresh basil,firmly packed
3 cloves garlic minced
1/2 c. pinenuts
1/2 c. fresh parsley
3/4 c. grated parmesean cheese
1 tsp. salt 1/2 tsp. pepper
Process. Then add 2/3 c. olive oil and process again.
The pesto can be eaten fresh, or it can be frozen.
To freeze, put into small containers and add a small amount of olive oil to the top. Seal and freeze!
Come back tomorrow to learn about oregano!
Debbie

You can also cut entire stems of basil for future use. According to E How Food, cut basil should not be stored in the refrigerator. They suggest, instead, that basil should be cut and then the stems should be put into a glass of water and left out on the kitchen counter top, where it will last for days or weeks. Note: If you purchase the basil at the store, cut the stems before putting into water. Also, the cut basil should not be in direct sunlight.
Freezing Basil...
Basil is a soft herb, but it can be easily frozen:
Chop the basil and put it into ice cube trays--cover each section with water and freeze. Pop the ice cubes out and store them in a large ziploc bag.

Another great way to freeze basil, is to coarsely chop it in a food processor,(with two or three tablespoons of olive oil drizzled in per batch.) Be sure that all leaves are coated with oil, (this will keep them from turning black in the freezer.) Kalyn's Kitchen has a step by step tutorial here.
Growing Basil...
Basil requires 6-8 hours of sunlight and well drained soil. Pinch off the flowers as they begin to form. Haylie let some of her basil flower, and it changed the flavor of the leaves on that stem. She pinched off the flowers, including the surrounding leaves, and the rest of the plant tasted ok.
Read more about growing basil here.
E How has a pesto recipe that I want to try. It sounds so easy!

Everything goes into a food processor:
2 cups fresh basil,firmly packed
3 cloves garlic minced
1/2 c. pinenuts
1/2 c. fresh parsley
3/4 c. grated parmesean cheese
1 tsp. salt 1/2 tsp. pepper
Process. Then add 2/3 c. olive oil and process again.
The pesto can be eaten fresh, or it can be frozen.
To freeze, put into small containers and add a small amount of olive oil to the top. Seal and freeze!
Come back tomorrow to learn about oregano!
Debbie
Monday, April 4, 2011
Using and Storing Fresh Herbs--Rosemary
I have loved having fresh herbs available, but I was not really sure what to do with them. This week I will share with you what I have learned.
 (Picture from veggiegardeningtips.com)
Rosemary is considered a hard herb. It is a wonderful savory herb that can be used for meats, breads, and any Mediterranean-type cooking. Sprigs of rosemary can be used whole, but it is more common to just use the leaves. To separate the leaves from the stem, hold the sprig by the top and strip the leaves down. I like to chop the leaves for some things, but you can also use them whole. Rosemary can be dried, but it tends to lose some of its flavor. Large stems can be soaked in water and used as skewers.
Here is a nice site about using rosemary.
You can store rosemary by picking it, washing it in cold water, and putting it in a ziplock bag. Put the bag in the freezer for a couple of weeks. Take the bag out of the freezer and roll it with a rolling pin until the leaves fall off. Separate the leaves from the stems and pack the leaves into a small canning jar with a tight-fitting lid. Label the jar and put it back in the freezer. (This works equally well for thyme.) You can read here for a more complete how-to from Kaylyn's kitchen, who says that the herbs can be stored this way for more than a year.
Growing rosemary- Most experts agree that it is easier to grow rosemary from a plant that you buy from a nursery. Rosemary can be propagated from an existing plant by following the information here.
They need lots of sunshine, and do not like to be too wet. Indoor rosemary plants need to be transplanted once a year.
Come back tomorrow to learn about how to use basil!
Debbie
Friday, April 1, 2011
An herb garden...waiting for spring
One of my favorite blogs is Budget Wise Homes,(see my sidebar), and she wrote a great post about creating a mini herb garden. I had been wanting to learn to cook with fresh herbs, so I decided to try her idea!
 I bought the clear containers at the dollar store, along with a package of rocks. I put the rocks in the bottom of the vases, poured in some potting soil, added the plants and tags with the name of the herb on it and that was it!

Tomorrow I will post about how to use your kitchen herbs!
Debbie


Tomorrow I will post about how to use your kitchen herbs!
Debbie
Wednesday, March 23, 2011
A Little Bit of Spring...Inside
My house has been the same colors forever....neutral colors, with accents of pink, blue. A year or two ago, I bought a sage green couch and began changing my accent colors to green and a brick red. I have LOVED the colors, but my kitchen was the same old colors:pink and blue.  I was looking for a piece of fabric to jazz up my kitchen window, and I fell in love with this floral print at JoAnn Fabrics. (They were having a great sale--50% off their home decorating fabric), so... I made this valance. (My husband thinks it looks like material you would find in a camp trailer, but what does he know!) I cut the fabric 2 times the width of the window and the length I wanted. Then I folded it in half the long way and cut the arch, (I really just winged it.) I cut a second piece out of lining material, sewed the two of them together, added a casing, and in less than 30 minutes I was done.
I love how the colors in the valance match my grandma's antique turkey platter and cookie jar, that sit on top of my kitchen cabinets. Here is another view...
 And another...
 I even found these aqua utensils at Shopko, on their Dollar Days sale. They matched everything perfectly.

Every time I look at my kitchen window, it makes me smile--it is a little bit of springtime...inside!
Happy first week of spring!
Debbie

I love how the colors in the valance match my grandma's antique turkey platter and cookie jar, that sit on top of my kitchen cabinets.


Every time I look at my kitchen window, it makes me smile--it is a little bit of springtime...inside!
Happy first week of spring!
Debbie
Monday, March 21, 2011
Is it Spring Yet?
The radio station out of Salt Lake City says that it is time to plant peas and my mailbox is full of seed catalogs...is it spring yet? The calendar says , "yes," but the weather is not cooperating--we had snow flurries today and they are forecast for the rest of the week. I decided to take matters into my own hands and celebrate the first week of spring! Here are a few fun spring treats, sure to chase away the "Winter Won't go Away Blues!"
 Bird Nest Cupcakes
Make a batch of mini cupcakes and frost them with green tinted frosting. Top them with a nest of Chinese noodles, a couple of peanut M&Ms and voila--spring treats in a jiffy.
Dirt Pudding is another quick and springy treat.
Mix up a box of chocolate pudding according to the directions. Add cool whip until the pudding is the consistency of an expensive mousse. Throw some chocolate cookies in the blender,(Oreos or cheap chocolate cookies will do). Put the "mousse" into clear plastic cups, top it with Oreo "dirt," plant a sprig of mint and you have a treat that looks like spring is here!
Keep thinking warm thoughts and maybe spring will decide to make its appearance!
See you tomorrow!
Debbie

Make a batch of mini cupcakes and frost them with green tinted frosting. Top them with a nest of Chinese noodles, a couple of peanut M&Ms and voila--spring treats in a jiffy.
Dirt Pudding is another quick and springy treat.

Mix up a box of chocolate pudding according to the directions. Add cool whip until the pudding is the consistency of an expensive mousse. Throw some chocolate cookies in the blender,(Oreos or cheap chocolate cookies will do). Put the "mousse" into clear plastic cups, top it with Oreo "dirt," plant a sprig of mint and you have a treat that looks like spring is here!
Keep thinking warm thoughts and maybe spring will decide to make its appearance!
See you tomorrow!
Debbie
Friday, March 18, 2011
Couponing!
Let me start by saying that my life is WAY too busy to coupon. I love to get things for cheap but who has time to figure out all the deals and then run to 5 different stores, not to mention that I would have to tow 3 kids, 5 and under along. After buying them snacks along the way as we marathon shop, I am sure to save nothing! Nevertheless, I coupon. Without kids. And it takes only a couple hours or so a week. How? An online site.
.
Although the site supplies you with all the leg work, there is still the problem of dragging several small children to multiple grocery stores. My solution is this: First, I limit the stores I visit to 2 a week. Usually the deals are mostly at one or two stores anyway and it has to be an amazing deal for me to spend any more time than that. I also do my shopping in the evening. When hubby gets home, we have dinner and then he does bedtime while I run out. I can tell you from experience that my trips are MUCH shorter and I stick to buying what I came for if I go without kids (or hubby)!
I have to warn you, couponing is quite addicting and you may find yourself standing at the checkout line grinning as you watch your bill go lower and lower with each beap of a coupon being scanned!
Subscribe to:
Posts (Atom)